How Do I Add an Icon to a Menu Entry? (Magic xpa 2.x)
You can add an icon to any menu entry, whether the menu is being accessed from the pulldown or the context menu structure. The same icon can also be used on the toolbar (see How Do I Add an Icon to the Toolbar?).
You can choose one of the internal Magic xpa icons, or, you can specify a bitmap file to use a customized icon.
You can add an icon to a menu entry by specifying it in the Menu Properties.
-
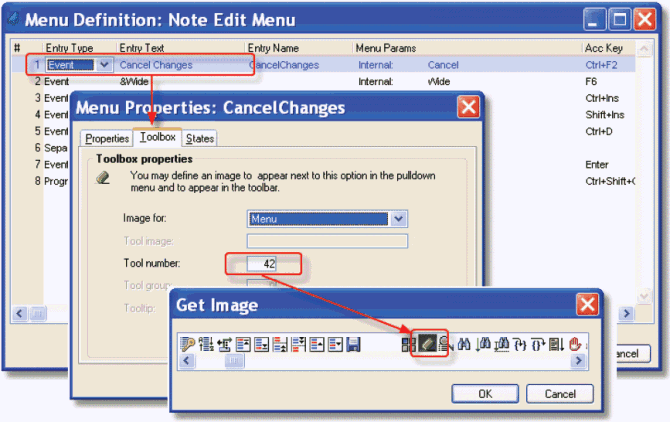
Go to the Menu repository (Shift+F6, or Project->Menus).
-
Go to the menu item that needs the icon. Press Alt+Enter to access the Menu properties.
-
Click on the Toolbox tab.
-
Set Image for: to Menu (if you want the icon only on the menu) or Both (if you also want it on the Toolbar).
-
To choose an icon from the internal Magic xpa icons, zoom from the Tool number field. Find the icon you want, and press Enter. The icon number will be brought back into the Tool number field, and a picture of the icon you chose will appear at the top of the Toolbox tab.
Now, the icon will appear on the menu entry at runtime.
Alternatively, you can choose a bitmap file for a customized icon, as shown below.
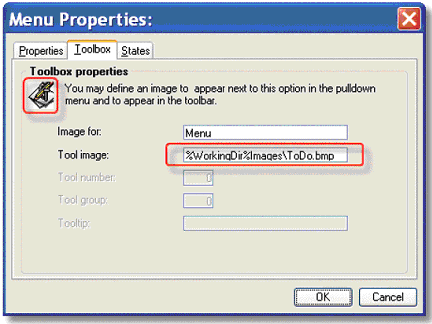
You can also specify your own icon. The icon should be 16x16 pixel bmp.
-
Proceed as above, but instead of specifying a Tool number, specify a Tool image. You can zoom from the Tool image field to select the file name, but it is best to use a logical name, as shown in our example.
-
The icon will appear at the top of the Toolbox tab.
